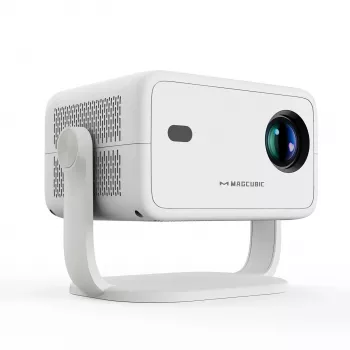
650 ANSI 4K Projector: Autofocus, Keystone & Setup Tips
650ANSI 4K Projector with Auto Focus & Keystone Correction: Setup, Performance, and What to Expect
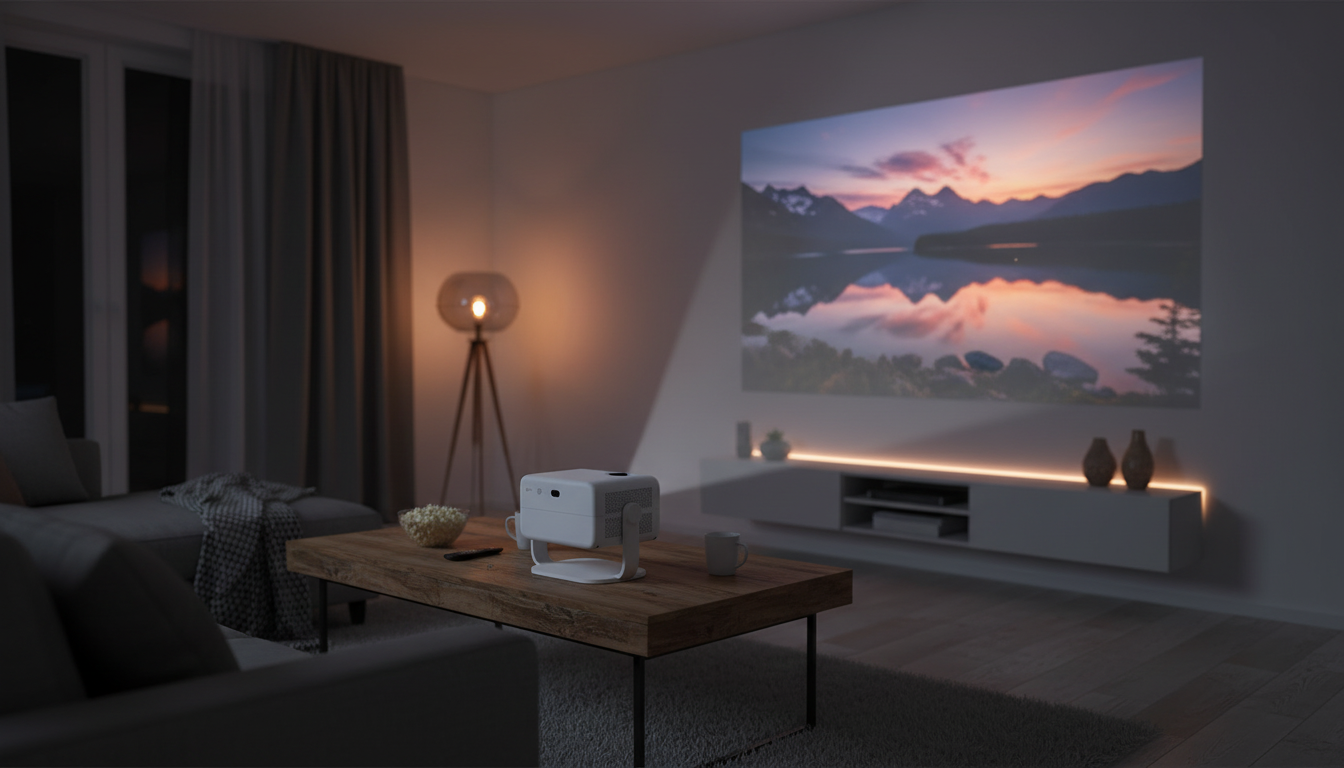
A bright-enough home projector is only enjoyable if it’s quick to set up and stays sharp without constant fiddling. Auto focus and keystone correction reduce the usual setup friction, while higher brightness (measured in ANSI lumens) helps preserve contrast and color in real rooms. This guide explains where a 650 ANSI class “4K” projector fits, how to place it, and how to get the cleanest picture for movies, games, and casual streaming.
Who this projector suits best
- Living rooms and multipurpose spaces where lighting can’t always be controlled
- Movie nights on a wall or screen with frequent repositioning (tripod, coffee table, shelf)
- Users who prefer fast setup: automated focus plus automated keystone reduces manual tweaking
- Apartment and dorm setups where the projector may be moved often and needs to “just work”
If convenience is the priority, the 650ANSI 4K Projector with Auto Focus & Keystone Correction is designed for quick alignment after each move, without turning setup into a 10-minute routine.
Understanding brightness and real-room viewing
Brightness is one of the fastest ways to separate “looks great on paper” from “looks good in your room.” ANSI lumens are a standardized measurement, which makes comparisons more meaningful than vague “lumens” marketing claims. (ProjectorCentral’s glossary is a helpful reference for what ANSI lumens represent: Lumens and ANSI Lumens.)
At around 650 ANSI lumens, you can typically expect comfortable viewing in dark to dim rooms, and workable performance with some ambient light when you keep the image size reasonable. Ambient light washes out dark scenes first, so small changes—closing curtains, turning off overheads, or adding gentle bias lighting behind the screen—can make movies look more “solid” and less gray.
| Room lighting | Typical use | Practical tip |
|---|---|---|
| Dark / lights off | Movies, cinematic content | Increase image size; keep brightness comfortable to avoid eye strain |
| Dim / some lamps | TV shows, sports, casual viewing | Aim for a smaller image size for richer blacks |
| Moderate ambient light | Cartoons, presentations, background viewing | Control glare and avoid projecting onto glossy walls |
Screen surface matters more than many first-time buyers expect. A dedicated screen usually delivers a more uniform image than textured paint, while a smooth, neutral-colored wall can still look excellent if it’s flat and clean.
Auto focus: what it does and how to get the sharpest image
Auto focus adjusts the lens after power-on or repositioning to maximize perceived sharpness. It’s a quality-of-life feature, but it still benefits from a few best practices:
- Use stable placement: Wobbly tables, vibrating stands, or springy floors can make focus “hunt” or land slightly soft.
- Give it a high-contrast target: If subtitles or menus look a touch fuzzy, pause on a high-contrast frame (like a settings menu) and let auto focus lock in before playback.
- Watch the corners: If the center is sharp but edges look softer, reduce keystone correction and re-check angle and height.
For frequent moves between rooms, auto focus is most helpful when paired with consistent habits: similar throw distance, similar stand height, and minimal tilt.
Keystone correction: when to use it (and when not to)
Keystone correction digitally squares the picture when the projector can’t be perfectly centered and level. It’s extremely useful for real-life constraints—like a coffee table that sits slightly off center—but it’s also a trade-off.
4K support and what “4K projector” can mean in practice
- Better source in, better picture out: Even when the native resolution isn’t full 4K, good scaling can make high-quality 4K streams look cleaner than older 1080p sources.
- Streaming settings matter: On a streaming stick or console, select the highest stable resolution and frame rate supported to avoid stuttering or excessive compression.
- Use reliable connections: A solid HDMI connection helps prevent dropouts and handshake issues; HDMI capabilities are outlined by the official licensing body: HDMI Specification Overview.
Placement basics: throw distance, image size, and comfort
| Step | Goal | Result |
|---|---|---|
| Level the projector | Minimize digital correction | Sharper corners and cleaner text |
| Center to the screen | Reduce trapezoid distortion | Less reliance on keystone |
| Run auto focus | Lock crisp detail | Cleaner subtitles and UI |
| Dim stray light | Improve contrast | Better shadow detail in dark scenes |
For longer viewing sessions, comfort matters too. If the projector is part of a work-from-home-and-watch setup, a supportive seat like the Mesh Office Chair with Lumbar Support can make extended sports, gaming, or binge sessions noticeably easier on your back.
What to check after unboxing
A budget-friendly pick with automated setup
If the projector will be moved between rooms, placed on different surfaces, or used in a dorm or apartment, automated focus and geometry correction can save time compared to fully manual models. For a simple starting point, the 650ANSI 4K Projector with Auto Focus & Keystone Correction is a straightforward option for casual cinema nights, sports, and everyday streaming.
FAQ
Is 650 ANSI lumens bright enough for daytime viewing?
It can work in moderately lit rooms if you keep the image size smaller and avoid direct light on the wall or screen. For the most satisfying contrast, use curtains or reduce overhead lighting whenever possible.
Does keystone correction reduce picture quality?
Digital keystone can soften fine detail and effectively reduce resolution because it’s reshaping the image. Leveling and centering the projector first, then using minimal correction, typically delivers the cleanest result.
How do auto focus and keystone work together during setup?
A practical flow is: place and level the projector, power on, let auto focus lock, then apply small keystone adjustments only if needed. If you move the projector or change distance significantly, give auto focus a moment to re-lock before judging sharpness.


Leave a comment